Wiring Harness Part 2

I haven't made much progress this fall on my wiring -with real life projects getting in the way :-) - but, I figured it was time to update the blog on what  has been done! I did mange to get the power block wires in place for the front and rear lights.


Other 6-Packers who have done this AAW conversion said to start at the rear of the car, so I followed their advice. The trunk makes a great place to keep your tools / connectors while doing the rear lights !


The right hand set of lights are all wired / installed, however, I'm waiting for the backup light lens for the left side and can't complete that side of the car until it arrives.


Getting the license plate lamps in place was a bit of a challenge... with little "J" clips that wanted to fall into the body and disappear forever! I finally figured out that a bit of silicone adhesive would keep them in place while I positioned the lamps.


Trying to keep the wires nice and tidy . This is the front, right hand turn signal.


Front turn signal / running lights wired and installed.


I thought I'd re-use the front side marker lights, but once they were installed, they stuck out like a sore thumb, so a call to TRF produced these nice replacements.


Guess I'd better "pick up the pace" if I'm going to get to the point where the engine can be started this spring!

Wiring Harness Part 1

Tillie's original wiring harness was a mess... bad splices, bare wires, cut and chopped wires,etc., so it didn't require an electrical engineering degree to know I had to replace the harness.
A new, original type harness is still available, but I spent some time reading about the Advanced Auto Wire (AAW) harness, originally designed by Dan Masters, and was convinced  that it was the correct way for me to proceed.
Several 6-Packers have installed the AAW harness, so I have tried to learn from their experiences.  My car should be easier, because it's a fresh rebuild with no interior "stuff" to get in the way!

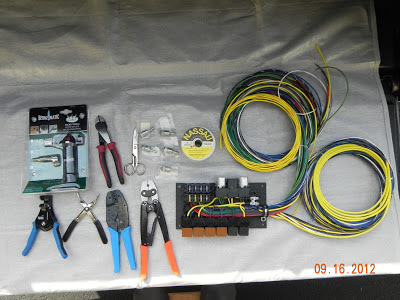
The "power block" on the right side of this photo is the heart of the AAW harness.This photo also shows the special tools recommended to help make for a first class installation.


The wiring diagram that comes with the harness takes a little time to understand unless you do this type of thing for a living, but taking small sections at a time seems to work best for me.


Of course, laying the wires out and doing a thorough inventory is a must !  You also need to look closely at the color of the wire and the color of the tracer...ie...green with a brown tracer looks very close to green with a red tracer.


Poor grounds are the cause of many electrical problems, so again, following the path of other 6-Packers, I decided to create several additional ground points. One of the cooler tools I bought for the grounding part of this project is the "bonding brush" used in the aircraft industry (Brown Aviation) to insure a good grounding surface.


This drill-mounted brush cuts through the paint / primer and creates a nice and neat round grounding point


The main ground cable attaches to the body and the engine.


One of two ground points added to the rear of the car.


Ground bar added to the front of the car

It's now time to start threading all those wires through the car...wish me luck !  

Radiator Time

The one thing on Tillie that I really didn't need to replace was the radiator, as the previous owner had replaced it just before selling me the car. However, the replacement was the stock type, and I wanted aluminum with an electric fan.  The 6-Pack forums have lots of posts regarding this topic, so I had a pretty good idea what I was getting into...not all aluminum radiators are perfect, several 6-packers have removed their aluminum units and replaced them with the stock copper types due to leakage. Having said that, many aluminum radiators are being used in old British cars with no problems, so I forged ahead. There are several vendors providing the aluminum units, but one name jumped out at me during my search. Brice Thomas Radiator in Gadsden, Alabama, makes radiators, oil coolers, and intercoolers  for heavy duty semi trucks and other industrial applications. They also cater to the off-road crowd and just about any antique/classic car you can imagine...TR6's included !


My radiator arrived with the shroud and Maradyne fan installed.


Someone in the Brice Thomas shop owns a TR6, so the mounting brackets are a perfect fit.


However, setting the the new radiator / fan into place quickly brought a "clearance " problem to light !
I called the good folks at Brice Thomas and they acknowledged that due to the "variances" in Triumph automobiles, the Maradyne fan could be too thick. They don't sell the Spal line of fans but suggested the thin Spal unit as a fix. They paid for the return of the Maradyne fan and quickly removed the fan price off my credit card.


A Google search turned up JayCorp Technologies as a Spal dealer for almost 15 years, and they had the 16" thin fan in stock.


The  Spal unit arrived in just a few days, and the existing holes in the shroud fit the new fan.

 Ok, that looks better !


Of course, a new radiator needs new hoses.  18 months earlier I had bought a set of hoses from BPNW (British Parts Northwest) when they were on sale. I know I got them, and I know I put them in my "new" parts box, but do you think I could find them 18 months later? Nope !  After carefully going through every box of new and old parts, twice!... I gave up and ordered another new set . 


Top radiator hose installed and looking good !


Water pump housing to manifold


Lower radiator hose


Top and bottom heater hoses 


Well, now it's time to move on to the wiring harness.  Yikes !!
Stay tuned !

A Bleeding Good Time !

Since Tillie is going through a complete ground up restoration, new brake lines and all related brake components have been either rebuilt or replaced.  Same with the clutch, all new or rebuilt. So, I've put all those components together and now comes the moment of truth...adding the brake fluid and seeing what leaks !

I had heard enough horror stories on the 6-Pack forum about paint damage caused by DOT 3 or 4 brake fluid, so the decision to use the more expensive DOT 5 was a no brainer. Dot 5 is silicone based and will not eat your fancy paint job for lunch, where as DOT 3 & 4 are glycol based and will damage that expensive paint job.  One of the big problems of switching over to DOT 5 is that it is not compatible with DOT 3 or 4, but in my case, everything was new and dry, so no old fluids to worry about.


I'd like to say that all my connections were solid with no leaks, but that's not the way it happened...I wiped up more brake fluid than I care to admit, but hey, there are a lot of  pipe joints....

The PDWA switch is used to alert the driver if one of the two brake circuits goes bad. This simple device has just two rubber "O" rings that can leak, and yep, mine leaked. I had  used the wrong size "O" rings.  :-(


 Front Brake Flex Lines


 Front Brake Calipers


 Rear Brake Wheel Cylinder


 Rear brake flex lines..well, you get the idea....lots of joints that have to be perfect, and they are...now.  ;-)


The hydraulic brake and clutch can't have any air in the lines in order to function properly, so getting that air out (once the leaks are fixed) is very important.
Growing up, my job was always the "pumper" when it came time to bleed the brake lines after replacing the brake shoes on the family's '58 Ford.  I'd sit in the car and my dad would be at the wheel opening. He would use an end wrench and a tube ( connected to the wheel cylinder bleeder) that went into a jar used to catch the brake fluid. He'd say, "push the brake pedal and hold it."  Dad would then open the bleeder, watch for the air bubbles / fluid to come out, then close the bleeder and tell me to repeat the push and hold process. Once just fluid and no air came out of that particular wheel cylinder, he'd move on to the next wheel after adding more fluid to the master cylinder. This method still works, but I figured there had to be an easier, one- person way to accomplish this task, so I did what any 21st century person would do...I did a Google search on bleeding brakes!

 I found lots of options, but Phoenix Systems makes a one- person bleeder that can do a reverse bleed process. It pulls the fluid out of the container at the wheel and pushes it up to the master cylinder. This seemed to work pretty good once the leaks were fixed, but even the directions that come with it say that you may need to pump fluid from the master cylinder back to the wheel cylinder to get rid of all the air, and I still had air in the lines.


After several hours of "messing" around trying to get all the air out, I took a break and did what I should have done in the beginning ....I did a search on the 6-Pack forum regarding bleeding brakes. When I came across the term "Speed Bleeder", learned how it works, (a small ball bearing and spring that keep out unwanted air), I got on eBay and ordered a set for all four wheels and one for the clutch slave cylinder.


The eBay vendor is located here in Ohio, so I had my new bleeders in two days. The idea behind these little jewels is that one person can crack open the bleeder then pump the brake pedal (without needing a second person). The ball bearing and spring close off the bleeder when you release the brake pedal. Now ideally, a second person could watch the fluid as it comes out of the bleeder and tell you when no more air bubbles appear, I just kept pumping until no bubbles were in the drain line and catch bottle.


 I was finally getting close, but the brake pedal still went almost to the floor before getting solid, and  I knew something was still not right. More 6-Pack forum searches produced my answer....I needed to adjust the rear brakes up solid, then back the adjuster off one quarter turn. Bingo, the brake pedal felt  perfect.


The clutch on a TR6 is hydraulic with a master cylinder and a slave cylinder. Once I got the solid pipe and flexible braided line installed, the speed bleeder made easy work of getting rid of the air.

Master Cylinder


Slave cylinder with drain tube attached to the bleeder.


Oh, there was just one little problem. It looks like there is plenty of fluid in the clutch master cylinder, but that amount is only good for about 4 pushes on the clutch pedal....try for a 5th push and you will hear a sucking sound. ARRGH, I just sucked air back into the line.  Start over and be more careful !


I'm quite confident my brakes and clutch are road worthy, but on this type of restoration it will be months before I can do a road test, so I'm going to move on to the radiator...stay tuned !

Aluminum Fuel Tank

Tillie's fuel tank had a lot of "gunk" laying in the bottom, so I knew I needed to do something....either have the original steel repaired, replace the original tank with a new steel tank, or replace the original with a Bastuck aluminum alloy tank. Wife Rhoda pushed me to go with the more expensive aluminum tank...what a Woman!!

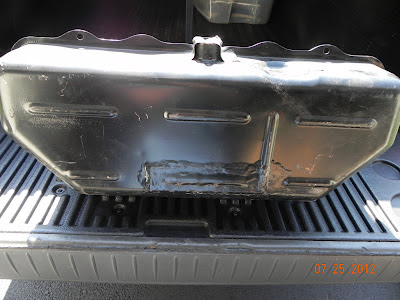
The original tank had been repaired at some time in the past, but a flash light inspection showed up rusty spots just waiting to clog up my triple ZS carbs !


The only vendor here in the U.S. that I could find who carries the German- made Bastuck aluminum alloy fuel tank is BPNW (British Parts North West).  Most of the time the tanks are not in stock, so in early January 2012, when I saw they had some available, I wasted no time ordering one.


 These tanks are made to bolt in exactly like the originals, plus they look very cool.


The Triumph factory originally put a strip of felt under the tank for noise control where the tank rests on the floor....I figured these stick-on felt furniture disks would do the same job.


I had already installed a new stainless steel fuel line, so getting new tank hardware seemed to make sense.


Replacing  the tank sending unit will help ensure an accurate fuel gauge.


The tank venting canister was long gone, so I decided to vent the tank through a K&N vent filter located directly below the trunk area of the car.


6-Pack members also recommenced putting a shut off valve in the fuel line...easy to do at this point. 


All installed....gosh, this is almost too pretty to cover up !


Once the tank installation was completed, I finished all the fuel connections up to the fuel pump.